Create buttons menu in xna, quickly and easily
Alec Jacobson
November 05, 2009
In my xna games, I'm often reusing the simple code that allows me to create a menu of buttons rather effortlessly and painlessly. I like this method because I don't need to maintain heavy classes, just a few global arrays. Here's a short tutorial showing how I make three-state buttons:
Step 1:
Assuming you have opened/created your XNA game project in Visual Studio, add the following to your global variables just under the public class Game1 : Microsoft.Xna.Framework.Game line:
        // Global variables
        enum BState
        {
            HOVER,
            UP,
            JUST_RELEASED,
            DOWN
        }
        const int NUMBER_OF_BUTTONS = 3,
            EASY_BUTTON_INDEX = 0,
            MEDIUM_BUTTON_INDEX = 1,
            HARD_BUTTON_INDEX = 2,
            BUTTON_HEIGHT = 40,
            BUTTON_WIDTH = 88;
        Color background_color;
        Color[] button_color = new Color[NUMBER_OF_BUTTONS];
        Rectangle[] button_rectangle = new Rectangle[NUMBER_OF_BUTTONS];
        BState[] button_state = new BState[NUMBER_OF_BUTTONS];
        Texture2D[] button_texture = new Texture2D[NUMBER_OF_BUTTONS];
        double[] button_timer = new double[NUMBER_OF_BUTTONS];
        //mouse pressed and mouse just pressed
        bool mpressed, prev_mpressed = false;
        //mouse location in window
        int mx, my;
        double frame_time;
Step 2:
Add the following to the protected override void Initialize() method:
            // starting x and y locations to stack buttons
            // vertically in the middle of the screen
            int x = Window.ClientBounds.Width/2 - BUTTON_WIDTH / 2;
            int y = Window.ClientBounds.Height/2 -
                NUMBER_OF_BUTTONS / 2 * BUTTON_HEIGHT -
                (NUMBER_OF_BUTTONS%2)*BUTTON_HEIGHT/2;
            for (int i = 0; i < NUMBER_OF_BUTTONS; i++)
            {
                button_state[i] = BState.UP;
                button_color[i] = Color.White;
                button_timer[i] = 0.0;
                button_rectangle[i] = new Rectangle(x, y, BUTTON_WIDTH, BUTTON_HEIGHT);
                y += BUTTON_HEIGHT;
            }
            IsMouseVisible = true;
            background_color = Color.CornflowerBlue;
Step 3:
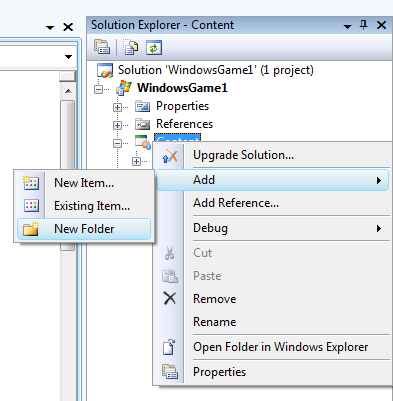
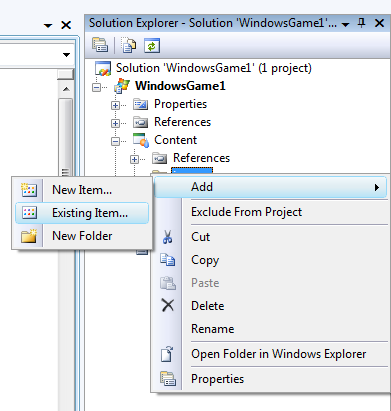 Add your button images to your content. Right-click on "Content". Select "Add > New folder", call the new folder "images". Right click on "images" and select "Add > Existing item..." and add your images. Here are the images I'll be using:


Step 4:
Add the following to the protected override void LoadContent() method:
            button_texture[EASY_BUTTON_INDEX] =
                Content.Load<Texture2D>(@"images/easy");
            button_texture[MEDIUM_BUTTON_INDEX] =
                Content.Load<Texture2D>(@"images/medium");
            button_texture[HARD_BUTTON_INDEX] =
                Content.Load<Texture2D>(@"images/hard");
Step 5:
Add the following to the protected override void Draw(GameTime gameTime) method:
            GraphicsDevice.Clear(background_color);

            spriteBatch.Begin();
            for (int i = 0; i < NUMBER_OF_BUTTONS; i++)
                spriteBatch.Draw(button_texture[i], button_rectangle[i], button_color[i]);
            spriteBatch.End();
            base.Draw(gameTime);
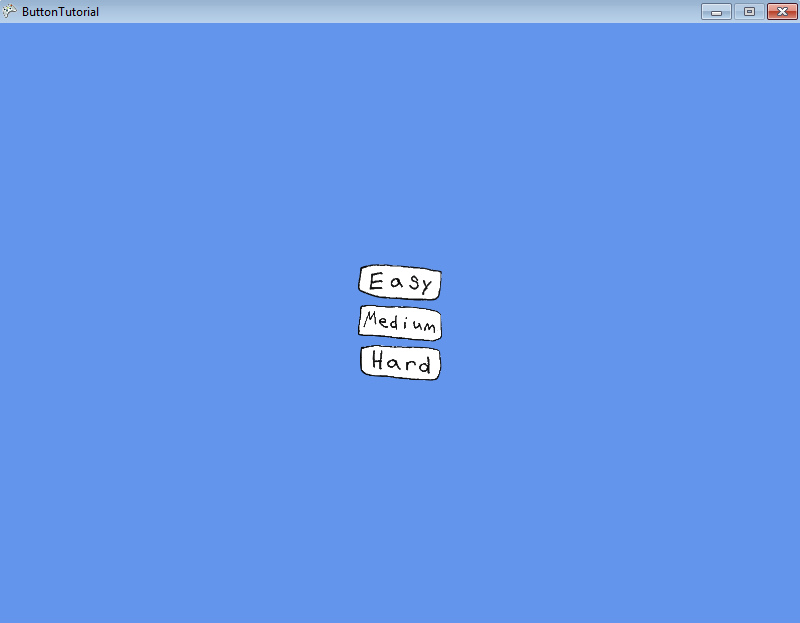
You should now be able to run your game and see your (static) button textures draw in the right place.
Step 6:
Add the following 5 methods to your main game class:
        // wrapper for hit_image_alpha taking Rectangle and Texture
        Boolean hit_image_alpha(Rectangle rect, Texture2D tex, int x, int y)
        {
            return hit_image_alpha(0, 0, tex, tex.Width * (x - rect.X) /
                rect.Width, tex.Height * (y - rect.Y) / rect.Height);
        }

        // wraps hit_image then determines if hit a transparent part of image
        Boolean hit_image_alpha(float tx, float ty, Texture2D tex, int x, int y)
        {
            if (hit_image(tx, ty, tex, x, y))
            {
                uint[] data = new uint[tex.Width * tex.Height];
                tex.GetData<uint>(data);
                if ((x - (int)tx) + (y - (int)ty) *
                    tex.Width < tex.Width * tex.Height)
                {
                    return ((data[
                        (x - (int)tx) + (y - (int)ty) * tex.Width
                        ] &
                                0xFF000000) >> 24) > 20;
                }
            }
            return false;
        }

        // determine if x,y is within rectangle formed by texture located at tx,ty
        Boolean hit_image(float tx, float ty, Texture2D tex, int x, int y)
        {
            return (x >= tx &&
                x <= tx + tex.Width &&
                y >= ty &&
                y <= ty + tex.Height);
        }

        // determine state and color of button
        void update_buttons()
        {
            for (int i = 0; i < NUMBER_OF_BUTTONS; i++)
            {

                if (hit_image_alpha(
                    button_rectangle[i], button_texture[i], mx, my))
                {
                    button_timer[i] = 0.0;
                    if (mpressed)
                    {
                        // mouse is currently down
                        button_state[i] = BState.DOWN;
                        button_color[i] = Color.Blue;
                    }
                    else if (!mpressed && prev_mpressed)
                    {
                        // mouse was just released
                        if (button_state[i] == BState.DOWN)
                        {
                            // button i was just down
                            button_state[i] = BState.JUST_RELEASED;
                        }
                    }
                    else
                    {
                        button_state[i] = BState.HOVER;
                        button_color[i] = Color.LightBlue;
                    }
                }
                else
                {
                    button_state[i] = BState.UP;
                    if (button_timer[i] > 0)
                    {
                        button_timer[i] = button_timer[i] - frame_time;
                    }
                    else
                    {
                        button_color[i] = Color.White;
                    }
                }

                if (button_state[i] == BState.JUST_RELEASED)
                {
                    take_action_on_button(i);
                }
            }
        }


        // Logic for each button click goes here
        void take_action_on_button(int i)
        {
            //take action corresponding to which button was clicked
            switch (i)
            {
                case EASY_BUTTON_INDEX:
                    background_color = Color.Green;
                    break;
                case MEDIUM_BUTTON_INDEX:
                    background_color = Color.Yellow;
                    break;
                case HARD_BUTTON_INDEX:
                    background_color = Color.Red;
                    break;
                default:
                    break;
            }
        }
The purpose of these methods are to determine a true button hover or click: hovering or clicking on the button texture that did not fall on a transparent pixel. Then take an action on buttons just clicked.
Step 7:
Add the following to the protected override void Update(GameTime gameTime) method (be sure it is above the line: base.Update(gameTime);):
            // get elapsed frame time in seconds
            frame_time = gameTime.ElapsedGameTime.Milliseconds / 1000.0;

            // update mouse variables
            MouseState mouse_state = Mouse.GetState();
            mx = mouse_state.X;
            my = mouse_state.Y;
            prev_mpressed = mpressed;
            mpressed = mouse_state.LeftButton == ButtonState.Pressed;

            update_buttons();
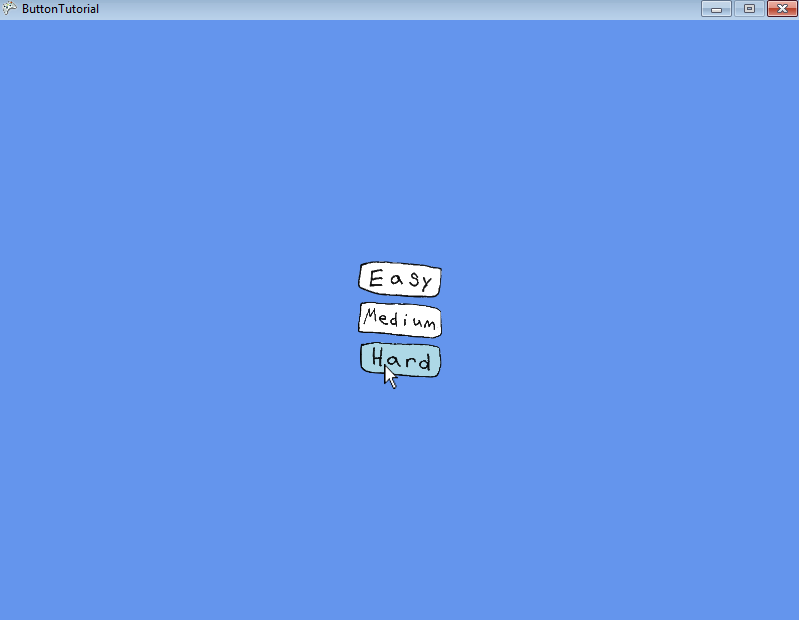
You should now have working buttons!
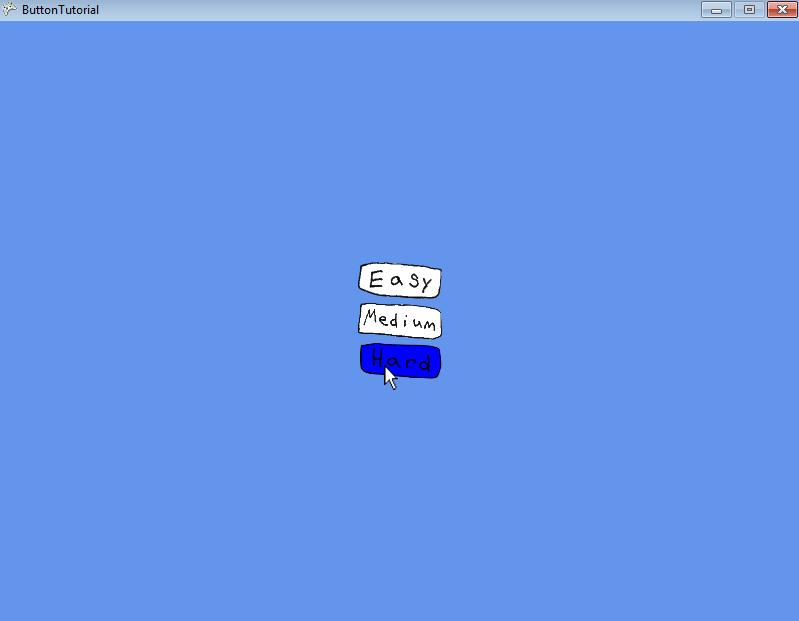
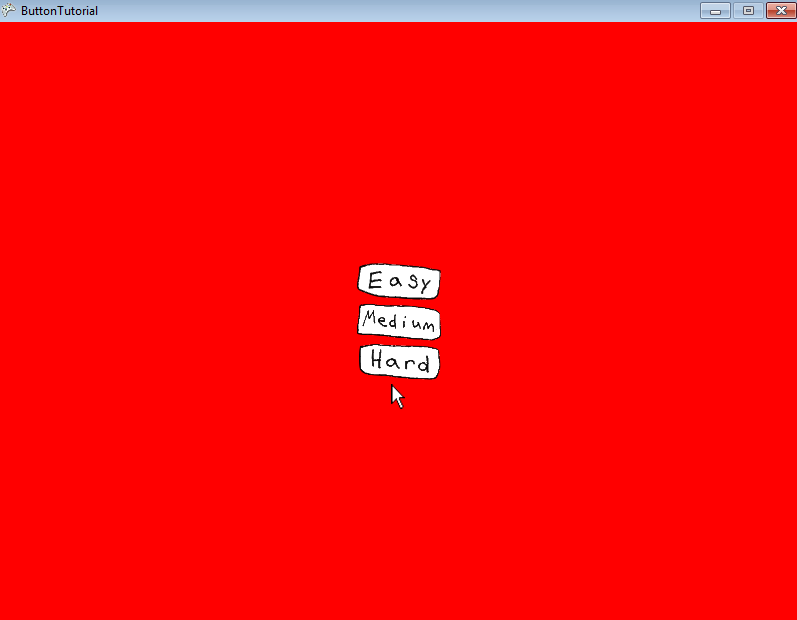
Here's some screen shots:
Step 8 (optional):
I like to support redundancy with the keyboard. Here's how I support keyboard shortcuts to my buttons:
Add the following to your global variables:
        // for simulating button clicks with keyboard
        KeyboardState keyboard_state, last_keyboard_state;
Add the method to your main class:
        // Logic for each key down event goes here
        void handle_keyboard()
        {
            last_keyboard_state = keyboard_state;
            keyboard_state = Keyboard.GetState();
            Keys[] keymap = (Keys[])keyboard_state.GetPressedKeys();
            foreach (Keys k in keymap)
            {

                char key = k.ToString()[0];
                switch (key)
                {
                    case 'e':
                    case 'E':
                        take_action_on_button(EASY_BUTTON_INDEX);
                        button_color[EASY_BUTTON_INDEX] = Color.Orange;
                        button_timer[EASY_BUTTON_INDEX] = 0.25;
                        break;
                    case 'm':
                    case 'M':
                        take_action_on_button(MEDIUM_BUTTON_INDEX);
                        button_color[MEDIUM_BUTTON_INDEX] = Color.Orange;
                        button_timer[MEDIUM_BUTTON_INDEX] = 0.25;
                        break;
                    case 'h':
                    case 'H':
                        take_action_on_button(HARD_BUTTON_INDEX);
                        button_color[HARD_BUTTON_INDEX] = Color.Orange;
                        button_timer[HARD_BUTTON_INDEX] = 0.25;
                        break;
                    default:
                        break;
                }

            }
        }
Finally add a call to that method in the protected override void Update(GameTime gameTime) method (be sure it is above the line: base.Update(gameTime);):
handle_keyboard();
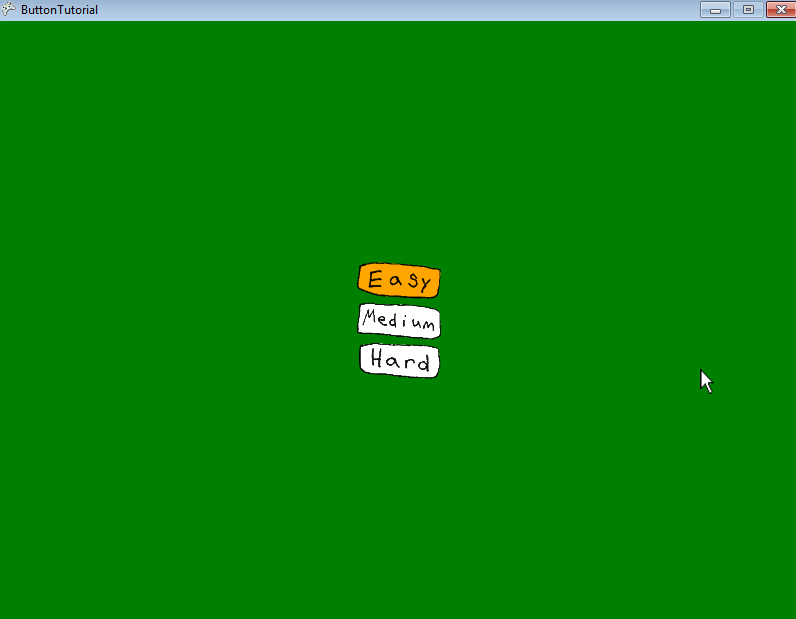
Now you should have keyboard redundant buttons. Here's a screen shot:
Note:
Most xna game projects have button classes and event managers, but I find that since buttons are usually not the focus of my game I'd rather just have four lightweight arrays and essentially two methods called on each update. Using rectangles instead of vectors to define positions for the buttons makes it really simple to stack and pack buttons vertically and horizontally. It's also nice to not really worry about the raw button image's width and height.
Update:
I've put up the finished product as a compiled Windows app.
Update:
I've uploaded a zipped folder of the Visual Studio project. I imagine you might have to change any absolute paths sprinkled in the files...so it might be easier to just copy from the above.